
It’s actually hard to believe that you can catch fish just by making a small hole through the ice! If you love fishing, you should always be able to think outside the box. You have fished in rivers, streams and the great seas but somehow, you skipped ice fishing! Or maybe you did not skip it, you simply thought that you couldn’t tolerate the cold, the chilly fresh air and snowfall for a couple of Northern pikes!
Well, think again. How about moving away from the tropics as well as the open waters to the chilly icy areas in Alaska for a few days with your fishing pole, license and a hot cup of cocoa or soup? Being totally alone in icy lands in the midst of peace and tranquility, catching fish – doesn’t it sound enticing? What more could you want for self-reflection? Even better, imagine yourself teaming up with your friends and family and surrounding yourself with the beautiful starry skies! Wouldn’t that be the perfect hangout you could ever think of?
If you are thinking about what I’m thinking, maybe it’s time for you to get yourself a portable ice fishing house! Yes, you’ve heard it right! Not that it is made of ice, but it is literally a house on wheels that you can use to get a comfortable fishing experience wherever you want. So start picking a destination because you’re about to make your own fishing ice house and go fishing with these ice fishing tips!
Some Must-Have Items Before Fishing out in the Chilling Cold
You are right to be slightly worried about what you need to take since this is the first time you’re going ice fishing. Aside from the obvious requirements of a valid fishing license, fishing rod and winter clothing, you will need some other items that will help you catch fish safely and with fun.
- A bucket: Bring along a bucket is wherein you can keep your fish and if it has a lid, you can sit on top of it while fishing.
- Life jackets: They are for your safety. There could be places where the ice is slightly thinner and melting. If you are a rookie you might not know where to set your foot on and you could fall into the icy waters if you’re unlucky. The life jacket could save you.
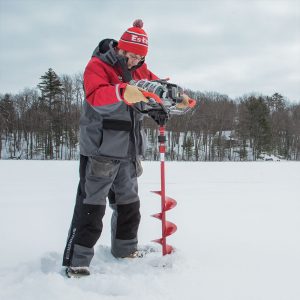
- Ice fishing augers: Ice fishing augers can be battery-powered or gasoline-powered which save you from most of the hard work. They come in a large range of sizes with the ability to make holes as small as four inches to eight inches or more. It could be smaller, but that would mean larger fish would be difficult to reel out. You can take ice scoops with you as well to remove snow and ice away from the holes.
- Ice fishing tip ups: These can be used to help catch larger fish, like northern pikes and walleye. They are signaling devices, which will indicate when a fish has caught your bait.
- Ice fishing jigs and bait: They’re needed along with the rod. Jigs and the type of bait usually depend on what kind and size of fish you want to catch.
Things You’ll Need to Build the Coolest Fishing Ice House Possible!
Before you try to manage all the necessary materials, my suggestion is to first gather the willingness to make it. You might get very tempted to just buy a portable fishing ice house, but they could turn out to be expensive. You can build a fishing ice house in just under $150!
Remember, you can make it more luxurious if you want to. But for the simple fishing enthusiast, a simple ice house is all that’s really needed.
Decide whether you want to make it big or small, which depends on whether you want to make it for solo fishing or group fishing. You should also decide beforehand if you’re going to sleep in it. If you do not want to freeze to death, you will need to think about how you will insulate your house and keep yourself warm. Keeping all this in mind, here is a list of materials that you will need to make your own fishing ice house which might not be so classy, but will work just fine!
- Take 25 pieces of wooden boards for framing, each board having dimensions of 2’x4’x8’ (Let’s just call these things “frame boards” to make it easier for you to understand.)
- 1 piece of thick plywood for the floor with 4’x8’ dimensions
- 6 sheets of utility panels, 2.4mm thick with 4’x8’ dimensions
- Wood glue
- 4 hinges
- A box of finishing nails for the utility panels, which will be used for making doors, roof, and sides
- 1 box of deck screws
- A Hammer
- A Screw gun
- A Saw
- A Pencil
- A Tape
- A Protractor (Remember that D-shaped tool lying in your geometry box that you had used in school?)
Building an Ice Shanty: All in a Day’s Work!
Start building the floor first
Take 5 of the frame boards and cut them to 45’’-length each. Place the boards apart from each other, with 24’’ spaces between each of the board. Now lay out 2 frame boards parallel to each other. The five chunks of wood you’ve just cut and spaced out would be in between these two boards. Now pin them in place with the deck screws. Your floor framework will be ready for fishing in winter.
Make runners so that you can move it on ice
Create 1’’ strips of wood from another frame board with a saw, keeping the length 8’’. Attach two or three strips to the floor framework and flip it. Now you can slide the framework over ice. You can also use a wood sealer if you want.
Attach the plywood floor
Make sure the plywood floor is on top of the framework, pinned properly with deck screws.
Now create the back wall support
Take five pieces of frame boards and cut each to 52’’-length. Ensure that each board has 26.5 degrees angle at the top. Attach these boards vertically where the back of your house will be, each being 24’’ apart. The two boards in the corners should not overlap the sides of the floor.
Time to build the side walls
You will need two side wall supports. Cut two frameboards to 52’’ length with a 26.5-degree angle at top and attach these with the back wall supports in the two corners. Cut two more boards but with a length of 75’’ with a 26.5-degree angle on top and attach them to the floor frame at the front vertically.
For the front door supports
Cut two frame boards to a 75.75’’-length at 26.5 degrees on top. Attach them vertically to the front. Now cut one frame board with a 26.5-degree angle across the side. This will be the top span of the door.
Finally, add the roof support
Cut five frame boards to a length of 56.5’’ and attach them to the roof accordingly on top of the vertical supports.
Attach the panels
The panels for the back wall, side walls and roof should be easy to attach. The panels should fit according to the size of the framework and vertical supports.
Build the doors
Take two panels and cut them in 6’x46’’ dimensions. If you want you can frame the door with the extra wood around the door perimeters. Build the door frame according to the size of the door and attach with wood glue and finishing nails. You can use 2’’x2’’ wood strips for this purpose.
Attach the door hinges
Since there are two doors, you will need four hinges – two for the left door and two for the right door. The hinges should be at the top and bottom of the door.
Hopefully, following these steps, you will be able to make an amazing ice fishing house in just one day. Don’t forget to use a weatherproof wood sealer so that your house lasts longer. Attach a rope outside, or you can attach wheels or skis underneath for more sophistication and easier movements. Place hooks inside the house where you can hang your fishing rod, clothes, and various accessories. You can even get a portable propane heater and stay warm while fishing! Bring along some coffee, books, and food, and enjoy the cold weather while waiting for your fish to grab onto your rod. The experience is amazing, unique and different from all other fishing styles that you may have tried before with your kayak or canoe. It will take some time getting used to it, but it will indeed be unforgettable!


")


