
Exercise bikes are pretty common exercise equipment which can be found in every average household to professional gym points. Exercise bikes, whether it is recumbent bikes or upright bikes, are simple machines with straight forward technologies. Due to regular use, it is very likely to have some periodic mechanical failures. You can repair your stationary bikes yourself without calling exercise bike repair service once you understand their basic mechanism.
In this article, I am going to discuss all the possible troubleshooting solution you can have with your fitness equipment repair with some effective maintenance tips which will reduce the chance of such problems in further.
Common Problems of Exercise Bikes
There can be three types of problem you can face with your exercise bikes. The problems can arise from mechanical failure, electronic problems or regular maintenance problem. Bikes can be great for home workout until a problem arises. The most occurring problems regarding exercise bikes are slipping off the belt, squeaking, exercise bike resistance repair problems and error codes. The spin bike repair and maintenance guidelines of these frequent exercise bike problems are explained below in a step by step process.
1. Slipping
Exercise belt slipping off is a pretty common problem. The belt soaks almost all the pressure you put into an exercise bike. If your belt is slipping off frequently, you have to tighten the belt or replace it.
Step 1:
Unplug the exercise bike before attempting to fix it. Do not use any kind of power tools to open the machine. If your machine has a warranty left, you might want to reconsider before attempting to fix the machine since it may void the warranty.
Step 2:
Remove both pedals by using a crank arm or Phillips screwdriver or Allen wrench. Remember, the right side pedal can be opened by clockwise movement and the left pedal can be opened through anti-clockwise movement. Remove the pedals carefully without defecting the threads. Using a crank arm puller might help in this regard.
Step 3:
After removing the pedals, remove the side shield by undoing the attached screws. Use flat head tools to remove the top and side shields to expose the flywheel and the belt.
Step 4:
Now, you need to lose the tension of the belt. You will find an Eddie Mech Idler bracket which is hard to miss irrespective of the model of your exercise bike. You will find a slightly big adjustment nut and an idler bolt on the outer and lower side of the Eddie mech bracket. You can lose or tighten the belt tensions by adjusting these two nuts.
Step 5:
You can tighten the belt by following the 4 steps mentioned above. However, to replace the belt you need to remove one Eddie mech from the structure of the bike. To do this you need release the tension cable first which is connected with the magnetic resistance motor. You can release the tension by using a flat head tool just as shown in the video.
Step 6:
Remove one Eddie mech from the bike’s main body after releasing the tension cable. Now you can easily remove and install a new bike belt. After installing the belt and Eddie mech plug the tension cable again to its place. If you’re a beginner and planning on starting working out on a spin bike, this belt problem can destroy your motivation. Since you now know the problem and possible solutions, it shouldn’t be bummer anymore.
2. Knocking or Squeaking
Rattling or knocking noise issue is common to stationary bikes and most of the times the solution to this frequent exercise bike problem is regular maintenance. The Knocking or Squeaking may arise from the worn out belt or wheels, or from the pedal or motor jamming by rustiness or moldiness.
To remove knocking or squeaking noise from your stationary bikes, you need to locate the source of the noise first. Most likely the noise comes from jammed pedals or the belt. You need to disassemble the bike first and clean and lubricate the source of noise to ensure a smooth function. Implementing a regular weekly or monthly maintenance routine can keep these types of problems at bay. We will discuss more on regular maintenance activities later in this article.
3. Magnetic Resistance Exercise Bike Problems
The magnetic resistance mechanism is at the heart of the stationary bike models. A magnetic field is used to create the resistance the bikes needs. It is generated through an electric circuit, pedaling action, flywheel, and a wheel gearbox. The electric console is responsible to control the speed and resistance intensity. Watch the following video to get a complete understanding of the magnetic resistance procedures.
If the console is causing the exercise bike tension control not working, then you have to replace the electric console or repair the existing one, which is best to be repaired or changed by a professional. However, if the flywheel or the wheel gearbox is the cause of the magnetic resistance failure then you can easily replace them. Follow the following steps to correctly diagnose and solve the magnetic resistance failure on your own.
Step 1:
Unplug the exercise bike before attempting to fix it. Do not use any kind of power tools to open the machine. If your machine has a warranty left, you might want to reconsider before attempting to fix the machine since it may void the warranty.
Step 2:
Remove both pedals by using a crank arm or Phillips screwdriver or Allen wrench. Remember, the right side pedal can be opened by clockwise movement and the left pedal can be opened through anti-clockwise movement. Remove the pedals carefully without defecting the threads. Using a crank arm puller might help in this regard.
Step 3:
After removing the pedals, remove the side shield by undoing the attached screws. Use flat head tools to remove the top and side shields to expose the flywheel and the belt.
Step 4:
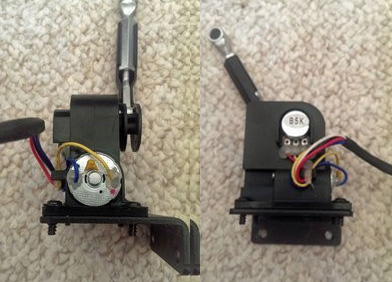
You can easily identify the wheel and the gearbox. The tension cable is connected with the wheel box and the gearbox. Check out the video provided above for more clear knowledge of the resistance mechanism. The motor gearbox might look like this.
Both upright bike and magnetic bikes can have this issue. So its better to search internet before getting your hands dirty.
After locating the gearbox and the wheel, it is easy to visually check if the magnetic resistance is working perfectly or not. A change in the tension cable in the gearbox should cause the magnetic bar inside the wheel to go deeper or come more to the outer side. If not, you have to change the gearbox or wheel. You can contact your service provider or the exercise bike producer for the parts you required. You can find the motor gearbox within $15 to $30.
4. Error Codes
Stationary bikes can show some error codes like E1, E6 or fail to start if there are problems in the electric console of the bike. The underlying cause of the error codes can vary from regular maintenance problem to complex electrical ones. You must follow the manufacturer’s bike repair manual to find out the specific solutions to the error codes your machine is showing. Or you can call in a professional to solve the problem.
Exercise Bike Maintenance Tips
Almost a lion’s share of the stationary bikes problems can be prevented by implementing regular maintenance procedures. Here are some standard stationary bike maintenance procedures that you should establish on a weekly or monthly basis.
- Wipe the exercise unit with a soft cloth (don’t use abrasive liquids or petroleum-based products to clean the bike).
- Inspect the accuracy of the sensors.
- Test the pedals and the straps
- Check out if there is any grinding or squeaking noise.
- Lubricate the flywheel, motor, and pedals.
- Adjust the belt tension regularly.
- Clean any grease or dust development on the bike.
You can increase the effectiveness and utility of your fitness equipment to many folds by establishing a routine maintenance procedure. You can solve most of the frequent occurring exercise bike troubleshooting. However, you are advised to do a warranty checkup before attempting to repair it on your own.


")


These tips are so amazing. I hope I can get the chance to repair one.